<Imageotag/>
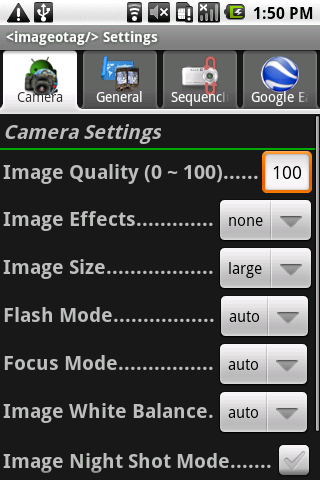
Camera Settings
The Camera Setting Menu allows various camera and images settings to be changed including -
* JPEG Image Quality between 0 & 100 where 0 is minimum quality and smallest files size and 100 is maxium quality and largest file size.
* The full range of supported Image Effects may be used including, color, monochrome, negative, solarise, sepia, posterise, whiteboard, blackboard & aqua.
* Three Image Sizes can be selected - large, medium and small. Image size may also vary for photos where zoom is used.
* Flash may be used on supported devices with auto, manual & off settings.
* Focus can be set to either auto or infinity
* Image White balance settings include auto, custom, incandescent, florescent, daylight, cloudy, twilight and shade.
* Night Shot Mode can be turned on and off.
* Camera Zoom level can be set on supported devices. Zoom is also provided in the Camera Preview using the scroll wheel.
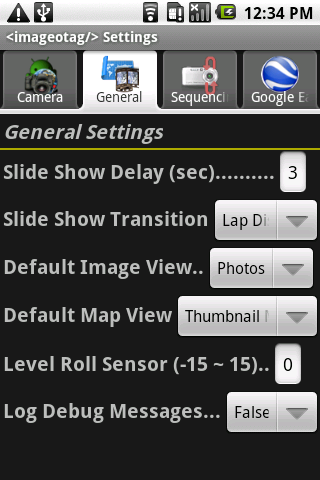
General Settings
General settings include -
* Slide Show Delay in seconds, the amount of seconds to display each image in a slide show.
* Slide Show transition selection, either lap dissolve or zoom dissolve.
* Set the default Image View when selected from the Camera Preview to show either Photos, Sequences, or Everything Image Views.
* Set the default Map View when selected from the Camera Preview to show either Photo Maps or Thumbail Map View.
* Level Roll Sensor adjustment can be used to adjust or calibrate the horizontal level of the Roll sensor as displayed in the Camera Preview. Adjustment can be required on devices such as the HTC Hero. Use this feature in conjunction with the device G-Sensor calibration app (in device Settings) on supported devices, place the device on a level surface and perform the G-Sensor calibartion first, then adjust the Imageotag Level Roll Sensor Values until the red marks appear to indicate the device is level in the Camera Preview. The values entered can be +ve or -ve and represent degrees.
* Log Debug Messages. When set to true debug messages are displayed in the development environment. Of no use otherwise.
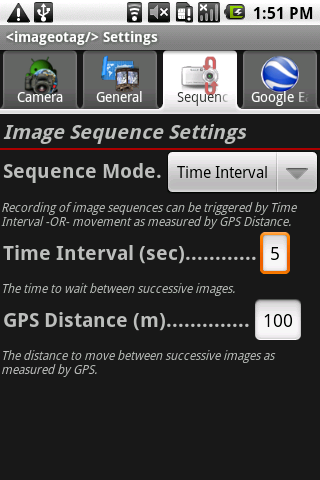
Sequence settings
Sequence settings is used to configure image sequence continuous capture modes.
Images sequences can be triggered by either Time Interval or GPS Distance.
Time Interval is the amount time of seconds to wait between successive images. When Time Interval is set to zero the device will take photos as rapidly as possible with an actual interval of approximately 3 seconds.
GPS Distance is the distance to move between successive images in meters as measured by the GPS.
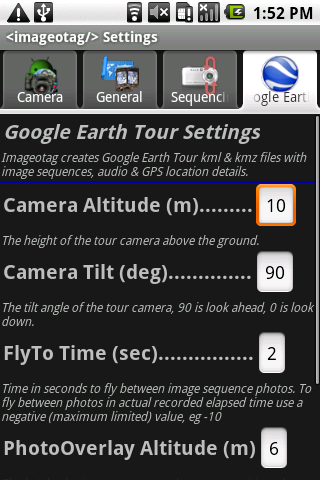
Google Earth Settings
Imageotag creates Google Earth™ tours from image sequences that can include audio commentary as well as images and location details. These tours can be shown within the Google Earth application on desktop/laptop/notebook computers.
Google Earth Tours are created automatically after a GPS image sequence has been recorded with Imageotag.
Google Earth Tours can be recreated after changing the following settings and or adding audio comments to sequence images.
To recreate a tour select the sequence list from the image sequence view and press the Make Earth Tour Menu button option. **This can take many minutes depending on the number of sequence images and audio in the tour***. Imageotag displays an Android notification icon at the top of the screen which shows the progress of making a tour.
The Google Earth Settings can be adjusted to change various attributes of the Tour created including -
* Camera Altitude in meters, the height of the Goolge Earth virtual camera viewpoint above the ground.
* Camera Tilt in degrees, the tilt angle of the Goolge Earth virtual camera, 90 is look ahead horizonatlly and 0 look down vertically.
* FlyTo Time in seconds, the Time in seconds to fly between successive image sequence photos. To fly between photos in actual recorded elapsed time use a negative (maximum limited) value, eg -10
* PhotoOverlay Altitude in meters, the height the image sequence photos are positioned above the ground.
* PhotoOverlay Tilt in degrees, the tilt angle of the image sequence photos, 90 is vertical, 0 is horizontal. Leave blank to use the actual tilt angle recorded for each image.
* PhotoOverlay Roll in degrees, the roll angle of the image sequence photos, 0 is horizontal. Leave blank to use the actual roll angle recorded for each image. (This option provide as a work around for a bug in Google Earth Version 6.0 where some Imageotag images are appearing upside down).
* Bearing or Compass. The direction that Image Sequence photos are facing can be set using either GPS Bearing or the device Compass. Bearing is the direction of movement measured by GPS, while Compass is the direction the device was facing when each photo was taken. Compass can be unreliable when affected by magnetic fields such inside a motor vehicle.
Imageotag Google Earth Tours file are saved as kml & kmz files in the com.imageotag/kml folder on the device SD card.
To play a tour, copy the kmz file to a computer with Google Earth installed, then start Google Earth and load the kmz file, to play the tour select Play Imageotag Tour from the selection panel.
The (zip format compatible) kmz files contain copies of Imageotag sequence images, audio and kml with location and tour details for the specified settings.
See the tutorial page for further details.
Please consider making a donation to support Imageotag development.